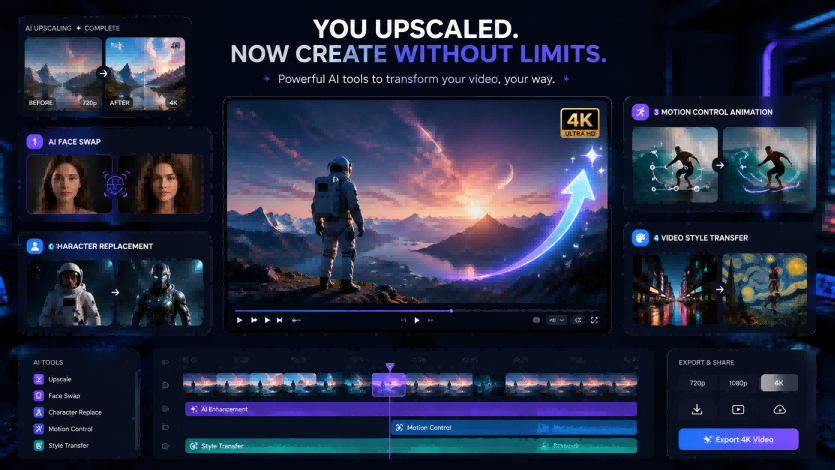
AI video upscaling is often the final step before publishing a video. It can help sharpen visible details, reduce blur, clean compression artifacts, and prepare footage for HD, 2K, or 4K screens. But for many creators, marketers, and video editors, upscaling can also be the beginning of a new creative workflow. Once your footage looks cleaner, you can use it as stronger source material for AI video editing. A sharper video usually gives you a better base for content repurposing, ad variations, social media clips, character-driven content, and stylized video projects. In this guide, we will look at five practical things you can do after upscaling a video. ## **1. Turn old or low-quality footage into new social content** Old videos often contain valuable moments, but they may look too blurry or compressed for modern platforms. AI video upscaling can help make those clips clearer before you repost them on YouTube Shorts, TikTok, Instagram Reels, or LinkedIn. After improving the quality, you can cut the best moments into short-form content, add captions, and create multiple versions for different platforms. This works especially well for: - old creator clips - archived brand videos - event recordings - interview highlights - tutorial snippets - behind-the-scenes footage A clearer video gives your content a more polished first impression, especially when viewers are watching on high-resolution mobile screens. 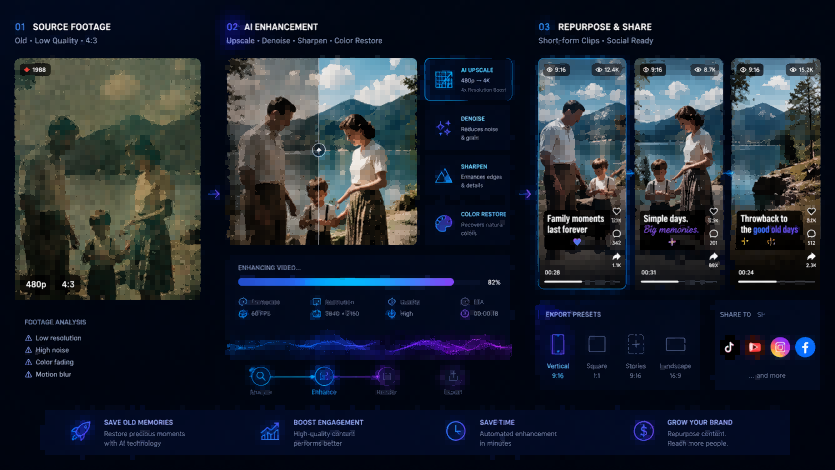 ## **2. Create face swap variations from a cleaner video** If you are making creator content, memes, social ads, or personalized video messages, you may want to create different versions of the same clip. That is where AI face swap can help. After upscaling your original video, you can use a video face swap workflow to replace the face while keeping the original expression, lighting, and movement as stable as possible. This can help creators produce multiple character versions from one clean source video. For example, you might upscale a talking-head video first, then use face swap to create different versions for: - creator avatars - localized campaigns - social media experiments - entertainment edits - personalized short videos If you want to transform an enhanced video with face swap, character replacement, motion control, or style transfer, try this [**AI video swap tool**](https://www.videoswap.app/). ## **3. Replace a character for ad localization or creative testing** Marketing teams often need many versions of the same video. Instead of shooting every version again, you can upscale the best-performing source video and then create new variants with character replacement. This is useful when you want to test different on-screen personas, audience segments, regions, or visual styles. Character swap can help when you want to: - create multiple ad variants from one scene - localize a campaign for different audiences - insert a new spokesperson into a product video - test different character looks - make branded creative assets faster The important part is to start with the cleanest possible source. If the original clip is blurry or compressed, upscaling it first can make the creative editing process feel more polished. 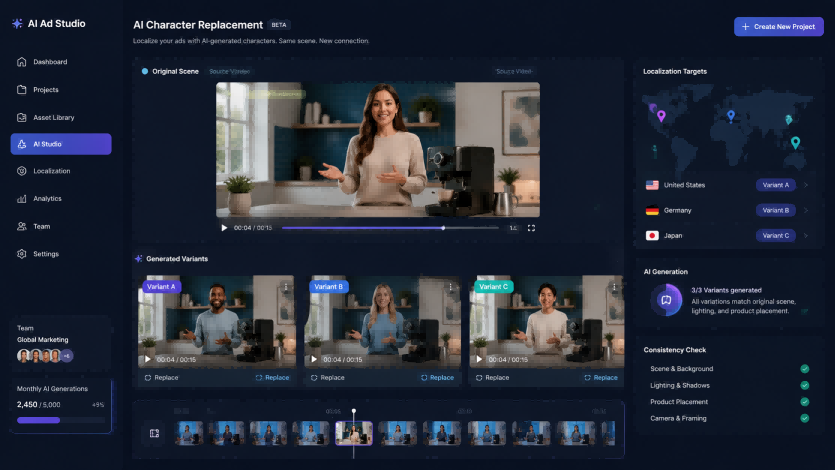 ## **4. Animate a still image with motion control** Not every video project starts with a video. Sometimes you may have a product image, portrait, mascot, illustration, or AI-generated character that you want to bring to life. AI motion control can use a reference performance or motion source to animate a static image. This is useful for: - virtual hosts - brand mascots - animated portraits - social media hooks - short-form storytelling - educational characters - product explainers A common workflow is to prepare your image, generate or choose a motion reference, create the animated video, and then upscale the final result for sharper output. ## **5. Apply video style transfer for a consistent brand look** Upscaling improves clarity, but style transfer changes the visual language of a video. After enhancing your footage, you can use AI video style transfer to convert it into a consistent look, such as anime, cinematic, cartoon, illustration, cyberpunk, watercolor, or branded visual style. This can be useful for: - YouTube series branding - social media campaigns - music visuals - short films - creator channels - educational explainers - brand storytelling If you are building a series, consistency matters. A clear source video plus a stable style transfer workflow can help every episode, clip, or ad variation feel like part of the same visual system. ## **A simple AI video workflow** Here is a practical workflow for creators and teams: ### **Step 1: Start with the best source video** Use the highest-quality version you have. Avoid re-downloading the same video from social media multiple times because each export may add more compression. ### **Step 2: Upscale and clean the video** Use AI video upscaling to improve clarity, reduce blur, clean noise, and prepare the footage for HD, 2K, or 4K output. ### **Step 3: Choose a creative AI video direction** Decide whether you want to create face swap versions, replace a character, animate a still image, or apply a new video style. ### **Step 4: Generate your AI-edited version** Use the creative AI video tool that matches your goal. Review the output for identity consistency, motion stability, lighting, and overall visual quality. ### **Step 5: Export and publish** Choose the right format and resolution for your final platform. For social media, 1080p may be enough. For websites, ads, large screens, or professional presentations, 2K or 4K may be more suitable. ## **When should you use upscaling before AI video editing?** Upscaling before creative AI editing is useful when your original video is visibly low quality. Use it when the video has: - low resolution - heavy compression - mild blur - old camera noise - poor detail - pixelated edges - reused social media footage However, upscaling is not magic. If the source video has extreme motion blur, missing details, severe artifacts, or unstable framing, the result may still be limited. The better the input, the better the creative workflow that follows. ## **When should you use AI video editing before upscaling?** Sometimes the better workflow is the opposite. If you are generating a new video through face swap, character swap, motion control, or style transfer, you may want to create the AI-edited version first, then upscale the final result afterward. This works well when the creative transformation is the main goal and upscaling is only the finishing step. For example: - generate a face swap video first, then upscale it - create a character swap ad variant first, then sharpen the final export - animate a still image first, then upscale the output - apply style transfer first, then enhance the finished version In short, use upscaling before AI editing when the source footage is weak. Use upscaling after AI editing when the final generated result needs more polish. ## **Conclusion** AI video upscaling can make your footage look sharper, cleaner, and more ready for modern screens. But it can also unlock more creative possibilities. After you enhance a video, you can repurpose it into social clips, create face swap versions, replace characters for ad testing, animate still images, or apply a consistent visual style. Use [**VideoUpscale.net**](http://VideoUpscale.net) when your footage needs better clarity. Then use [**VideoSwap.app**](http://VideoSwap.app) when you want to transform the content itself with face swap, character replacement, AI motion control, or video style transfer. Together, these two workflows can help you move from low-quality footage to polished, creative, publish-ready AI video content.
What to Do After Upscaling a Video: 5 Creative AI Video Ideas
May 14, 2026
After upscaling a video to HD or 4K, learn how to repurpose it with AI face swap, character swap, motion control, and video style transfer.
ai tools